201310 月8
自定义EditText实现信纸效果
自定义EditText实现信纸效果
作者:wtmdbf
一、引言
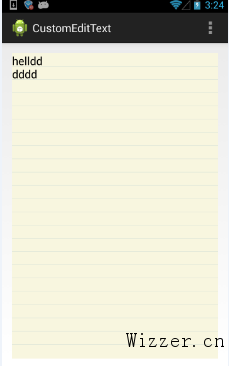
用户在提交表单的时候,我们可能会希望展示一个美观的输入框,以提升用户体验。二、效果

三、实现细节
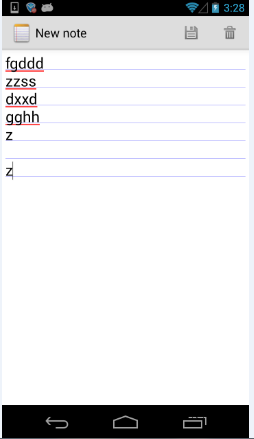
读者可以看到就是给EditText设置一个黄色的背景,然后给每一行添加一个下划线。为了看出不同,我们这里拿android提供的notepad这个demo的效果来做下比较,下面是notepad的截图 从从上可以看出,notepad的下划线是在产生新的行以后才绘制出来的,为了读者阅读的方便,我把notepad的源码贴出来如下:
public static class LinedEditText extends EditText {
        private Rect mRect;
        private Paint mPaint;

        // This constructor is used by LayoutInflater
        public LinedEditText(Context context, AttributeSet attrs) {
            super(context, attrs);

            // Creates a Rect and a Paint object, and sets the style and color of the Paint object.
            mRect = new Rect();
            mPaint = new Paint();
            mPaint.setStyle(Paint.Style.STROKE);
            mPaint.setColor(0x800000FF);
        }

        /**
         * This is called to draw the LinedEditText object
         * @param canvas The canvas on which the background is drawn.
         */
        @Override
        protected void onDraw(Canvas canvas) {

            // Gets the number of lines of text in the View.
            int count = getLineCount();

            // Gets the global Rect and Paint objects
            Rect r = mRect;
            Paint paint = mPaint;

            /*
             * Draws one line in the rectangle for every line of text in the EditText
             */
            for (int i = 0; i < count; i++) {

                // Gets the baseline coordinates for the current line of text
                int baseline = getLineBounds(i, r);

                /*
                 * Draws a line in the background from the left of the rectangle to the right,
                 * at a vertical position one dip below the baseline, using the "paint" object
                 * for details.
                 */
                canvas.drawLine(r.left, baseline + 1, r.right, baseline + 1, paint);
            }

            // Finishes up by calling the parent method
            super.onDraw(canvas);
        }
    }
那是如何实现我所说的一开始就绘制好下划线的效果呢,在此之前,你需要了解如何在android中获得字体的高度,网上有很多,为了方便大家阅读特摘录如下,先看图:
 然后我们可以通过下面的代码获得字体大高度
Paint p = new Paint();
p.setTextSize(50);
p.setAntiAlias(true);
FontMetrics fm = p.getFontMetrics();
int textHeight = (int) (Math.ceil(fm.descent - fm.ascent) + 2);
读者了解了上面的知识点以后就可以,在看我是如何实现的。 基本思想是根据字体的高度,在view的对应位置上绘制好每条line,代码如下:
package com.example.customedittext;

import android.content.Context;
import android.graphics.Canvas;
import android.graphics.Color;
import android.graphics.Paint;
import android.graphics.Paint.FontMetrics;
import android.util.AttributeSet;
import android.view.Gravity;
import android.widget.EditText;

public class CustomEditText extends EditText {

    private Paint mPaint;
    private int lines = 0;
    private float fontHeight = 0;
    private float leading = 0;

    public CustomEditText(Context context, AttributeSet attrs, int defStyle) {
        super(context, attrs, defStyle);
        initPaint();
    }

    public CustomEditText(Context context, AttributeSet attrs) {
        super(context, attrs);
        initPaint();
    }

    public CustomEditText(Context context) {
        super(context);
        initPaint();
    }

    private void initPaint() {
        mPaint = new Paint();
        mPaint.setStyle(Paint.Style.STROKE);
        mPaint.setColor(Color.parseColor("#CDDCD5"));
        mPaint.setAntiAlias(true);
    }

    @Override
    public void onWindowFocusChanged(boolean hasWindowFocus) {
        super.onWindowFocusChanged(hasWindowFocus);
        int lineHeight = getLineHeight();
        int viewHeight = getHeight();
        lines = viewHeight / lineHeight;
        setGravity(Gravity.TOP);
        float textSize = getTextSize();
        Paint paint = new Paint();
        paint.setTextSize(textSize);
        FontMetrics fontMetrics = paint.getFontMetrics();
        fontHeight = fontMetrics.descent - fontMetrics.ascent;
        leading = fontMetrics.leading;// leading == 0
        setBackgroundColor(Color.parseColor("#F8F6DF"));
    }

    @Override
    public void onDraw(Canvas canvas) {
        super.onDraw(canvas);
        int count = getLineCount();
        if (count <= lines) {
            for (int i = 1; i < lines; i++) {

                canvas.drawLine(0, fontHeight * i + leading * i, getWidth(),
                        fontHeight * i + leading * i, mPaint);
            }
        } else {
            for (int i = 1; i < count; i++) {
                canvas.drawLine(0, fontHeight * i + leading * i, getWidth(),
                        fontHeight * i + leading * i, mPaint);
            }
        }
    }

}
四、存在的问题和遗留点
虽然最主要的效果已经实现了,但还有一些问题- 如何定义一个只能输入固定行数的EditText?
- 细心的朋友会发现当输入的行数过多的时候会发现字体与横线的距离会发生偏差,原因是画出来的线不精确,如果按照android notepad那样绘制出来的线是精确的,但达不到我们一开始想要的那种效果,如何让我们的绘制更加精确,**热心的朋友如果知道或者有更好的方法的话,欢迎分享**?