文章标签 ‘Android’
201911 月13

2019双11入手华为全家桶 Mate 30 Pro 5G 、FreeBuds 3 、车载无线充电

谈谈使用体验:

一、手机篇

实体店现货买的翡冷翠(本来预订青山黛,但实在等不了一个月,看有现货就拿了),6899¥什么优惠都没,就送了个透明手机壳,手机壳还是满合身的,满满的安全感。考虑屏幕那么大,还是花了299¥买了碎屏险。手机出厂自带贴膜(据说第一批出厂手机没贴膜),所以这点比较好,不用纠结贴什么膜了,上手即用。

1、系统

对于做IT的来说,上手很快,摸索一圈就知道权限如何设置、通知啊、广告怎么移除等。隔空手势用了,感觉实用性不大,试想下看着抖音,用手悬停半秒,然后隔空滑动屏幕,手抬着很累的手酸了都,还没手动滑屏比较快。

发现一个bug,或也可以说设置不合理的地方,156版本系统,短信的通知关闭后不知道如何打开。设置项不在“通知”里,也不在“应用”一级菜单里,而是需要到“应用”下面的“应用管理”里面,找到“信息”,然后再点“通知管理”,对于新手来说,跟捉迷藏一样,不百度或者问客服,真不知道。

APP的打开及使用,响应速度很快,几乎和iOS系统一样,为什么说几乎呢,是因为一些功能细节上,能感觉出比iOS系统慢那么一丢丢,比如微信支付成功的通知,可能与系统的通知机制不一样造成的,不过不影响使用,几乎察觉不出来。游戏还没安装,暂时略过。

短信拦截/手机拦截等功能太好了,每天收到几十条推销短信/电话,不用单独安装拦截软件,太爽了吧。

NFC功能也很好,8P虽然带NFC但是几乎没有用武之地,华为手机的NFC可以模拟小区门禁卡,真是很方便的。

关于提子,装了v2xxxNG,正好昨天又申请新的G服务器,搭建提子可以上x网,但是没有G套件,只能通过网页访问G的服务,还不是很方便。

壁纸和锁屏界面,可以自动更新一些精美的照片,很好。

情景智能,是自动弹出来的一个功能,开通后可以绑定手机号,通过快递查询平台查询到关联的所有快递物流信息,功能还是比较贴心的。

说几点不爽之处吧:

1)Android系统里的一些官方APP内嵌广告,这个在苹果APP里很少见;

2)各种APP各种请求权限,什么存储、位置、读取设备信息等等,一般很难判断该不该禁用,有的权限禁用了APP就启动不了了,如果都赋权,那么感觉手机像裸奔。

2、屏幕

屏幕很亮眼,逛商城的时候四五个小姐姐围着手机看,有一定的误操作的几率,可能用习惯就好了吧,毕竟拿到手还没有48小时。

屏幕分辨率,刚从8p LCD切换过来的时候还不习惯,看多了也就习惯了,给眼睛一个适应过程。

3、后置摄像头

额,怎么说呢,广角拍出来效果很好,但AI有点过度,色彩失真。近距拍摄,不是那么清晰的感觉,可能每个人体验不一样吧,个人感觉摄像头数量很多,但效果不是说的那么神(不知道为啥群里的网友拍的都那么好看?我是买到了假的么……23333)。平时拍照少,也就无所谓了。

3、前置摄像头

这个要吐槽一下了,后置摄像头有AI美化,前置摄像头一点AI和美化都没有,当镜子照啊,可以非常清晰的看到脸上的斑点/粉刺/黑头,额……

4、电量

比较给力的,比之前用的ip8p持久的多了。

二、车载无线快充电

今早上班开车20来分钟,60%电量充到80%,目测一天不用手动充电,上班下班通过车载充电就够用了啊哈哈哈。买的27W功率的那款。

三、蓝牙耳机

Freebuds 3 双11刚买,EMS 12号中午就送到了。耳机支持蓝牙5.1协议版本,Mate 30 Pro 5G 也是5.1协议,搭配起来很爽哦,正好坐在靠路边的窗口位置,试用了下降噪功能,开启主动降噪功能,路上的车水马龙声音真的消失了,,不过办公室里的说话声音是过滤不掉的。耳机不带调节音量功能 – -。

还有个买蓝牙耳机的重要原因,那就是Mate 30 系列打电话是屏幕发声,不开免提都能听到声音,所以为了隐私,打电话还是用蓝牙耳机比较好。

201410 月24

Android:tcpdump抓包命令

adb shell

su

chmod 777 /data/local/tcpdump

/data/local/tcpdump -p -vv -s 0 -w /sdcard/capture.pcap

20148 月28

Cordova:Toast浮动提示插件

第一步:编写插件类

package cn.xuetang.plugin;

import android.widget.Toast;
import org.apache.cordova.CallbackContext;
import org.apache.cordova.CordovaInterface;
import org.apache.cordova.CordovaPlugin;
import org.json.JSONArray;
import org.json.JSONException;

/**
 * Created by Wizzer on 14-8-28.
 */
public class ToastPlugin extends CordovaPlugin {
    public ToastPlugin() {

    }

    public boolean execute(String action, JSONArray args, CallbackContext callbackContext) throws JSONException {
        if (this.cordova.getActivity().isFinishing()) return true;
        if (action.equals("show")) {
            this.show(args.getString(0));
        } else if (action.equals("showlong")) {
            this.showlong(args.getString(0));
        } else {
            return false;
        }
        callbackContext.success();
        return true;
    }

    public void show(String message) {
        Toast.makeText(this.cordova.getActivity(), Toast.LENGTH_SHORT).show();
    }

    public void showlong(String message) {
        Toast.makeText(this.cordova.getActivity(), message, Toast.LENGTH_LONG).show();
    }
}


第二步:配置  res/xml/config.xml

    <feature name="ToastPlugin">
        <param name="android-package" value="cn.xuetang.plugin.ToastPlugin" />
    </feature>

注:这里的 feature name ,要和↓↓面讲的的js文件里一致。


第三步:创建js文件 plugins/toast.js

/**
 * Created by Wizzer on 14-8-28.
 */
cordova.define("cn.xuetang.plugin.ToastPlugin", function(require, exports, module) {
    var exec = require('cordova/exec');
    module.exports = {

        /**
         * 一共5个参数
         第一个 :成功回调
         第二个 :失败回调
         第三个 :将要调用的类的配置名字(在config.xml中配置↑↑)
         第四个 :调用的方法名(一个类里可能有多个方法 靠这个参数区分)
         第五个 :传递的参数  以json的格式
         */
        show: function(message) {
            exec(null, null, "ToastPlugin", "show", [message]);
        },
        showlong: function(message) {
            exec(null, null, "ToastPlugin", "showlong", [message]);
        }
    };

});

注:js里两个方法,分别对应类中的两个方法


第四步:修改 cordova_plugins.js 引用 tocas.js

在 module.exports = [ ] 中追加如下代码:

    {
        "file": "plugins/toast.js",
        "id": "cn.xuetang.plugin.ToastPlugin",
        "merges": [
            "navigator.toast"
        ]
    }


最后:调用

       navigator.toast.show("再点击一次退出");

       navigator.toast.showlong("再点击一次退出");


20148 月28

Cordova:连续按两次返回键退出程序

/**
 * Created by Wizzer on 14-8-28.
 */
var num = 0;
var login = {
    initialize: function () {
        this.bindEvents();
    },
    bindEvents: function () {
        document.addEventListener('backbutton', this.eventBackButton, false);
    },
    eventBackButton: function () {
        num++;
        if (num > 1) {
            navigator.app.exitApp();
        }
        navigator.toast.show("再点击一次退出");
        // 3秒后重新计数
        var intervalID = window.setInterval(function() {
            num=0;
            window.clearInterval(intervalID);
        }, 3000);
    }
};

浮动提示插件见:
/?p=3026

201310 月8

自定义EditText实现信纸效果

自定义EditText实现信纸效果

作者:wtmdbf 

一、引言

用户在提交表单的时候,我们可能会希望展示一个美观的输入框,以提升用户体验。

二、效果

图片说明文字

三、实现细节

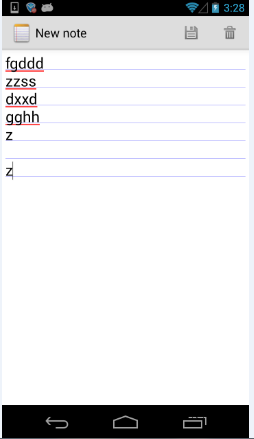
读者可以看到就是给EditText设置一个黄色的背景,然后给每一行添加一个下划线。为了看出不同,我们这里拿android提供的notepad这个demo的效果来做下比较,下面是notepad的截图
图片说明文字

从从上可以看出,notepad的下划线是在产生新的行以后才绘制出来的,为了读者阅读的方便,我把notepad的源码贴出来如下:

public static class LinedEditText extends EditText {
        private Rect mRect;
        private Paint mPaint;

        // This constructor is used by LayoutInflater
        public LinedEditText(Context context, AttributeSet attrs) {
            super(context, attrs);

            // Creates a Rect and a Paint object, and sets the style and color of the Paint object.
            mRect = new Rect();
            mPaint = new Paint();
            mPaint.setStyle(Paint.Style.STROKE);
            mPaint.setColor(0x800000FF);
        }

        /**
         * This is called to draw the LinedEditText object
         * @param canvas The canvas on which the background is drawn.
         */
        @Override
        protected void onDraw(Canvas canvas) {

            // Gets the number of lines of text in the View.
            int count = getLineCount();

            // Gets the global Rect and Paint objects
            Rect r = mRect;
            Paint paint = mPaint;

            /*
             * Draws one line in the rectangle for every line of text in the EditText
             */
            for (int i = 0; i < count; i++) {

                // Gets the baseline coordinates for the current line of text
                int baseline = getLineBounds(i, r);

                /*
                 * Draws a line in the background from the left of the rectangle to the right,
                 * at a vertical position one dip below the baseline, using the "paint" object
                 * for details.
                 */
                canvas.drawLine(r.left, baseline + 1, r.right, baseline + 1, paint);
            }

            // Finishes up by calling the parent method
            super.onDraw(canvas);
        }
    }

那是如何实现我所说的一开始就绘制好下划线的效果呢,在此之前,你需要了解如何在android中获得字体的高度,网上有很多,为了方便大家阅读特摘录如下,先看图:
图片说明文字
然后我们可以通过下面的代码获得字体大高度

Paint p = new Paint();  
p.setTextSize(50);  
p.setAntiAlias(true);  
FontMetrics fm = p.getFontMetrics();  
int textHeight = (int) (Math.ceil(fm.descent - fm.ascent) + 2);

读者了解了上面的知识点以后就可以,在看我是如何实现的。

基本思想是根据字体的高度,在view的对应位置上绘制好每条line,代码如下:

package com.example.customedittext;

import android.content.Context;
import android.graphics.Canvas;
import android.graphics.Color;
import android.graphics.Paint;
import android.graphics.Paint.FontMetrics;
import android.util.AttributeSet;
import android.view.Gravity;
import android.widget.EditText;

public class CustomEditText extends EditText {

    private Paint mPaint;
    private int lines = 0;
    private float fontHeight = 0;
    private float leading = 0;

    public CustomEditText(Context context, AttributeSet attrs, int defStyle) {
        super(context, attrs, defStyle);
        initPaint();
    }

    public CustomEditText(Context context, AttributeSet attrs) {
        super(context, attrs);
        initPaint();
    }

    public CustomEditText(Context context) {
        super(context);
        initPaint();
    }

    private void initPaint() {
        mPaint = new Paint();
        mPaint.setStyle(Paint.Style.STROKE);
        mPaint.setColor(Color.parseColor("#CDDCD5"));
        mPaint.setAntiAlias(true);
    }

    @Override
    public void onWindowFocusChanged(boolean hasWindowFocus) {
        super.onWindowFocusChanged(hasWindowFocus);
        int lineHeight = getLineHeight();
        int viewHeight = getHeight();
        lines = viewHeight / lineHeight;
        setGravity(Gravity.TOP);
        float textSize = getTextSize();
        Paint paint = new Paint();
        paint.setTextSize(textSize);
        FontMetrics fontMetrics = paint.getFontMetrics();
        fontHeight = fontMetrics.descent - fontMetrics.ascent;
        leading = fontMetrics.leading;// leading == 0
        setBackgroundColor(Color.parseColor("#F8F6DF"));
    }

    @Override
    public void onDraw(Canvas canvas) {
        super.onDraw(canvas);
        int count = getLineCount();
        if (count <= lines) {
            for (int i = 1; i < lines; i++) {

                canvas.drawLine(0, fontHeight * i + leading * i, getWidth(),
                        fontHeight * i + leading * i, mPaint);
            }
        } else {
            for (int i = 1; i < count; i++) {
                canvas.drawLine(0, fontHeight * i + leading * i, getWidth(),
                        fontHeight * i + leading * i, mPaint);
            }
        }
    }

}

四、存在的问题和遗留点

虽然最主要的效果已经实现了,但还有一些问题

  • 如何定义一个只能输入固定行数的EditText?
  • 细心的朋友会发现当输入的行数过多的时候会发现字体与横线的距离会发生偏差,原因是画出来的线不精确,如果按照android notepad那样绘制出来的线是精确的,但达不到我们一开始想要的那种效果,如何让我们的绘制更加精确,**热心的朋友如果知道或者有更好的方法的话,欢迎分享**?

原文作者: wtmdbf

原文地址: http://my.eoe.cn/readonly/archive/15757.html

20133 月8

Phonegap开发经验总结:Android与iOS应用开发的平滑移植

之前用phonegap做过Anroid项目,主要功能是人员定位、表单提交、拍照上传、通知提醒等功能,这也是最常用而基本的应用功能,最近打算出iOS版本的客户端,这里简单总结使用phonegap开发的一些经验以及探讨代码在不同手机系统的平移工作。

1、PhoneGap介绍

PhoneGap是一个用基于HTML,CSS和JavaScript的,创建移动跨平台移动应用程序的快速开发平台。这是PhoneGap最大的优点,支持jquery使其开发功能简单而强大。官方网站为 http://www.phonegap.com/ 更新速度较快,一般1个月就会发布一个新版本支持最新版本的手机系统。

既然要实现跨平台开发,大部分功能代码要做到可移植复用,在保持安全性、功能性的基础上尽量使用HTML+JS+PhoneGap API来实现业务功能,尽量避免使用手机系统的SDK开发实现。

UI层使用 Jquery Mobile ,API介绍见 http://www.jqmapi.com  ,定义了表单元素、页面和对话框等,和PhoneGap结合使用比较方便。

2、Android应用开发

2.1 数据库操作

PhoneGap API数据库操作是跨平台的,所以这里介绍后iOS段就不再赘述。

	var db ;
    document.addEventListener("deviceready", onDeviceReady, false);
    function onDeviceReady() {
        db = window.openDatabase("testdb", "1.0", "MyApp", 12000000);      
        db.transaction(creatDB,errorDB); //创建表    
		db.transaction(loginDB,errorDB); //查询表初始化表单    
    }	
    function creatDB(tx)
    { 
        tx.executeSql('CREATE TABLE IF NOT EXISTS USER (ID,LOGINNAME,PASSWORD)');  
    }
    function errorDB(err) {
       navigator.notification.alert("异常信息: "+err.code,null,"温馨提示","确定");
    }
    function loginDB(tx) {
	    tx.executeSql('SELECT * FROM USER', [], querySuccess, errorDB);  
    }
    function querySuccess(tx, results) {
        var len = results.rows.length;
        if(len>0)
        { 
            $("#loginname").val(results.rows.item(0).LOGINNAME);//LOGINNAME大写
            $("#password").val(results.rows.item(0).PASSWORD);   
        }
    }

2.2 表单提交

使用jquery+JSON解析和提交表单,常用示例:

	function getData(){
	    //{"mc":"Hello World!","list":[{"key":"0001","value":"张三"},{"key":"0002","value":"李四"}]}
		$.mobile.showPageLoadingMsg( "加载中....." ); //打开加载进度条	
		$.post(//使用jquery的POST方法  serverurl 放在公共JS里定义
				serverurl+ "/json/getdata.jsp",
				{
					"doAction":"getdata",
					"loginname":comHT.get("loginname"),//comHT 定义了从URL获取参数赋值到Hashtable中方法
					"password":hex_md5(comHT.get("password")),//hex_md5 实现对密码的加密
					"resourceid":"00100002",
					"rmd":Math.random()
				},
				function(data) {
					var jsondata = jQuery.parseJSON(data); //解析数据为JSON格式
                    $("#mc").val(jsondata.mc);//文本框赋值
					jQuery.each(jsondata.list, function(index, obj) {
						$("#czyy").append('<option value="'+obj.key+'">'+obj.value+'</option>');//下拉框架赋值  
					});
					$.mobile.hidePageLoadingMsg(); //关闭进度条

				});
	}

2.3 拍照上传

使用phonegap提供的API来使用,iOS下代码略有不同,注:此段代码phonegap 为2.0.0

原理是先把文件提交,提交成功后获得服务器真实路径,在表单提交的时候保存进数据库。

<img style="width:120px;height:120px;" id="zpzp1" src="../image/zpsc.png" onclick="pz(this,1)" /> 
<input type="hidden" id="zp1" value="">
    function pz(obj,v_zdz) {
		zdz=v_zdz;
		zpobj = obj;
		navigator.camera.getPicture(onSuccess, onFail, {
			quality : 25,
			destinationType : Camera.DestinationType.FILE_URI
		}); 
	}
 	// 采集操作成功完成后的回调函数
	function onSuccess(imageURI) {
		zpobj.src = imageURI;
		uploadFile(imageURI);
	}
	// 采集操作出错后的回调函数
	function onFail(error) {
	}
	// 上传文件到服务器
	function uploadFile(path) {
		    var ft = new FileTransfer();
		    var loginname=comHT.get("loginname");
            var options = new FileUploadOptions();
            var fn=loginname+"-"+path.substr(path.lastIndexOf('/')+1);
            options.fileKey="file";
            options.fileName=path.substr(path.lastIndexOf('/')+1);
            options.mimeType="image/jpeg";
            options.chunkedMode = false; 
		    ft.upload(
				 path, 
				 serverurl+"/json/upload.jsp?fn="+fn,
			     function(result) {
					 var jsondata = jQuery.parseJSON(result.response);
					 $("#zp"+zdz).val(jsondata.path);
					 navigator.notification.alert("照片"+zdz+" "+decodeURI(jsondata.res),null,"温馨提示","确定");
		         }, 
		         function(error) {
		        	 navigator.notification.alert("照片"+zdz+" 上传失败!"+ error.code,null,"温馨提示","确定"); 
		         }, 
		         options
		    );
	}

2.4 人员定位

采用百度定位SDK,从用户表中读取用户标识,详细的开发过程过繁琐不写了(好吧,下班了。。),下载和查看百度定位SDK请访问

http://developer.baidu.com/map/geosdk-android-download.htm

2.5 通知提醒

使用androidpn来实现android下消息推送功能,嗯,这个网上教程比较多,大家搜一下吧。


3、iOS应用开发

首先搭建iOS开发环境,详见本站教程 /?p=2438 ,目前phonegap 2.5.0支持iOS6.0以下版本,iOS6.1暂时不支持要等phonegap新版咯。

拍照功能需要真机测试,而真机测试需要证书,这大大的头疼,还好找到了方法,就是找到了一篇《Xcode 4.5.2 + iOS 6.0免证书(iDP)开发+真机调试+生成IPA全攻略》文章,哇哈哈,iOS6.1也适应。文章地址 http://www.cnblogs.com/yuanxiaoping_21cn_com/archive/2012/11/15/2772388.html


3.1 数据库操作

同android,略。

3.2 表单提交

同android,略。

3.3 拍照上传

在研究,以后更新。

3.4 人员定位

在研究,以后更新。

3.5 通知提醒

在研究,以后更新。

201212 月27

jquerymobile 实现提示框

引入JS和CSS文件:

<link rel="stylesheet" href="../css/jquery.mobile-1.0.1.min.css" />
<link rel="stylesheet" href="../css/jquery.mobile.simpledialog.min.css" /> 
<script type="text/javascript" src="../js/jquery.js"></script>
<script type="text/javascript" src="../js/jquery.mobile-1.0.1.min.js"></script>
<script type="text/javascript" src="../js/jquery.mobile.simpledialog2.min.js"></script>

JS代码:

$('<div>').simpledialog2({
				mode: 'button',
				headerText: '提示',
				headerClose: true,
				buttonPrompt: '请选择商品',
				buttons : {
					'确定': {
						click: function () { 
							//$('#outputbutton1').text('OK');
						}
					}
				}
			});


20126 月20

Android:扫描获取AP信息

增加权限:

<uses-permission android:name=”android.permission.ACCESS_WIFI_STATE” />
<uses-permission android:name=”android.permission.CHANGE_WIFI_STATE” />

WifiManager wifiManager = (WifiManager) getSystemService(WIFI_SERVICE);
			   WifiInfo wifiInfo = wifiManager.getConnectionInfo();
			  showMsg(wifiInfo.toString());//自己的显示方法

			  wifiManager.startScan();
			  List mWifiList = wifiManager.getScanResults();
			  for(int i=0;i<mWifiList.size();i++)
				  logger.d(mWifiList.get(i).toString());//自己重构的日志方法
201110 月31

里程碑2 MIUI简单演示

201110 月15

里程碑2 ME722 CM7简单演示

20117 月31

Android开发:休眠唤醒或开机后cmwap/cmnet网络不能连接的解决办法

Android手机(移动GSM)在休眠或开机后不能成功启用网络链接(设置都正常),有时候甚至状态栏图标是连接的,但网络依旧不可用。

如下解决方法,不知可通用,但测试HTC野火手机移动版可使用:

(被这个问题折腾死了,从本站相关文章可以看到,之前尝试了APN切换也不行,估计是网络enable==false)

package com.wiz.tools;

import java.lang.reflect.Method;

import android.content.ContentResolver;
import android.content.ContentValues;
import android.content.Context;
import android.database.Cursor;
import android.database.SQLException;
import android.net.ConnectivityManager;
import android.net.NetworkInfo;
import android.net.Uri;
import android.telephony.TelephonyManager;
import android.util.Log;
/**
 * Wizzer.cn
 * @author Wizzer
 *
 */
public class NetCheck {
	public static final Uri APN_URI = Uri.parse("content://telephony/carriers");
	public static final Uri DEFAULTAPN_URI = Uri
			.parse("content://telephony/carriers/restore");
	public static final Uri CURRENT_APN_URI = Uri
			.parse("content://telephony/carriers/preferapn");
	public static Context c1;

	public static String getCurrentAPNFromSetting(ContentResolver resolver) {
		Cursor cursor = null;
		try {
			cursor = resolver.query(CURRENT_APN_URI, null, null, null, null);
			String curApnId = null;
			String apnName1 = null;
			if (cursor != null && cursor.moveToFirst()) {
				curApnId = cursor.getString(cursor.getColumnIndex("_id"));
				apnName1 = cursor.getString(cursor.getColumnIndex("apn"));
			}
			Log.e("NetCheck getCurrentAPNFromSetting", "curApnId:" + curApnId
					+ " apnName1:" + apnName1);
			// find apn name from apn list
			if (curApnId != null) {
				cursor = resolver.query(APN_URI, null, " _id = ?",
						new String[] { curApnId }, null);
				if (cursor != null && cursor.moveToFirst()) {
					String apnName = cursor.getString(cursor
							.getColumnIndex("apn"));
					return apnName;
				}
			}

		} catch (SQLException e) {
			Log.e("NetCheck getCurrentAPNFromSetting", e.getMessage());
		} finally {
			if (cursor != null) {
				cursor.close();
			}
		}

		return null;
	}

	public static int updateCurrentAPN(ContentResolver resolver, String newAPN) {
		Cursor cursor = null;
		try {
			// get new apn id from list
			cursor = resolver.query(APN_URI, null, " apn = ? and current = 1",
					new String[] { newAPN.toLowerCase() }, null);
			String apnId = null;
			if (cursor != null && cursor.moveToFirst()) {
				apnId = cursor.getString(cursor.getColumnIndex("_id"));
			}
			Log.e("NetCheck updateCurrentAPN", "apnId:" + apnId);
			// set new apn id as chosen one
			if (apnId != null) {
				ContentValues values = new ContentValues();
				values.put("apn_id", apnId);
				resolver.update(CURRENT_APN_URI, values, null, null);
			} else {
				// apn id not found, return 0.
				return 0;
			}
		} catch (SQLException e) {
			Log.e("NetCheck updateCurrentAPN", e.getMessage());
		} finally {
			if (cursor != null) {
				cursor.close();
			}
		}

		// update success
		return 1;
	}

	public String getApn(Context c) {
		boolean netSataus = false;

		ConnectivityManager conManager = (ConnectivityManager) c
				.getSystemService(Context.CONNECTIVITY_SERVICE);	
		if (conManager.getActiveNetworkInfo() != null) {
			netSataus = conManager.getActiveNetworkInfo().isAvailable();

		}
		NetworkInfo info = conManager
		.getNetworkInfo(ConnectivityManager.TYPE_MOBILE);
		String oldAPN = StringUtils.null2String(info.getExtraInfo());
		Log
		.e("NetCheck getApn", "oldAPN:" + oldAPN + " netSataus:"
				+ netSataus);
		if (netSataus == false) {
			Log.e("NetCheck getApn", "setMobileDataEnabled(true)");
			setMobileDataEnabled(c, true);	

			try {
				Thread.sleep(4012);
			} catch (InterruptedException e) {
				e.printStackTrace();
			}
		}
		if("".equals(oldAPN)){			
			updateCurrentAPN(c.getContentResolver(), "cmnet");
			try {
				Thread.sleep(1500);
			} catch (InterruptedException e) {
				e.printStackTrace();
			}
		}
		info = conManager
		.getNetworkInfo(ConnectivityManager.TYPE_MOBILE);
		oldAPN = StringUtils.null2String(info.getExtraInfo());
		Log
				.e("NetCheck getApn", "newApn:" + oldAPN);
		return oldAPN.toLowerCase();
	}

	public boolean setMobileDataEnabled(Context c, boolean enabled) {
		final TelephonyManager mTelManager;
		mTelManager = (TelephonyManager) c
				.getSystemService(Context.TELEPHONY_SERVICE);
		try {

			Method m = mTelManager.getClass()
					.getDeclaredMethod("getITelephony");
			m.setAccessible(true);
			Object telephony = m.invoke(mTelManager);
			m = telephony.getClass().getMethod(
					(enabled ? "enable" : "disable") + "DataConnectivity");
			m.invoke(telephony);
			return true;
		} catch (Exception e) {
			Log.e("NetCheck ", "cannot fake telephony", e);
			return false;
		}
	}

}
20117 月15

Android 开发:APN网络切换之CMNET

最近被Android系统的APN自动切换网络问题折腾死了,软件使用CMNET网络,而系统自带的一些软件必须使用CMWAP,或者手机厂家搞的一些后台服务或者流氓软件总是在切换网络。没办法,只好想个解决之道了。

我的解决方案是:
1、在程序启动时,注册 Receiver 监视网络状态,当网络发生变化判断不是CMNET时则切换网络;
2、为了保险起见,在每个HTTP链接请求前加上网络判断。

本软件主要实现了功能如下:
拍照、定位、表单文件上传、查询、短信拦截(用于通过短信指令获得手机当前位置)、拨打电话、定时自动上传定位数据、版本更新等。

如下粘贴APN网络判断网站代码:
1、NetworkChangeReceiver  网络状态监视

package com.wiz.receiver;

import com.wiz.tools.NetCheck;
import com.wiz.tools.StringUtils;

import android.content.BroadcastReceiver;
import android.content.Context;
import android.content.Intent;
import android.net.ConnectivityManager;
import android.net.NetworkInfo;
import android.util.Log;

public class NetworkChangeReceiver  extends BroadcastReceiver {
	NetCheck netCheck=new NetCheck();
	 public void onReceive(Context context, Intent intent) {
		 Log.e("NetworkChangeReceiver", "onReceive");
		 ConnectivityManager conManager= (ConnectivityManager)context.getSystemService(Context.CONNECTIVITY_SERVICE); 

        if (ConnectivityManager.CONNECTIVITY_ACTION.equals(intent.getAction())) {
            NetworkInfo info = conManager.getNetworkInfo(ConnectivityManager.TYPE_MOBILE);
            String apn = StringUtils.null2String(info.getExtraInfo());
            if (!"cmnet".equals(apn.toLowerCase())) {
            	netCheck.checkNetworkInfo(context);
            }
        }
    }
}

2、Activity 中注册 NetworkChangeReceiver

NetworkChangeReceiver ncr = new NetworkChangeReceiver();
IntentFilter upIntentFilter = new IntentFilter( ConnectivityManager.CONNECTIVITY_ACTION);
this.registerReceiver(ncr, upIntentFilter);// 网络状态监控

3、APN判断及网络切换

package com.wiz.tools;
import android.content.ContentResolver;
import android.content.ContentValues;
import android.content.Context;
import android.database.Cursor;
import android.database.SQLException;
import android.net.ConnectivityManager;
import android.net.NetworkInfo;
import android.net.Uri;
import android.util.Log;

public class NetCheck {
	public static final Uri APN_URI = Uri.parse("content://telephony/carriers");
	public static final Uri CURRENT_APN_URI = Uri
			.parse("content://telephony/carriers/preferapn");
	public static String getCurrentAPNFromSetting(ContentResolver resolver) {
        Cursor cursor = null;
        try {
            cursor = resolver.query(CURRENT_APN_URI, null, null, null, null);
            String curApnId = null;
            String apnName1=null;
            if (cursor != null && cursor.moveToFirst()) {
                curApnId = cursor.getString(cursor.getColumnIndex("_id"));
                apnName1 = cursor.getString(cursor.getColumnIndex("apn"));
            }
            cursor.close();
            Log.e("NetCheck getCurrentAPNFromSetting","curApnId:"+curApnId+" apnName1:"+apnName1);
            //find apn name from apn list
            if (curApnId != null) {
                cursor = resolver.query(APN_URI, null, " _id = ?", new String[]{curApnId}, null);
                if (cursor != null && cursor.moveToFirst()) {
                    String apnName = cursor.getString(cursor.getColumnIndex("apn"));
                    return apnName;
                }
            } 

        } catch (SQLException e) {
            Log.e("NetCheck getCurrentAPNFromSetting",e.getMessage());
        } finally {
            if (cursor != null) {
                cursor.close();
            }
        } 

        return null;
}
	public static int updateCurrentAPN(ContentResolver resolver, String newAPN) {
        Cursor cursor = null;
        try {
            //get new apn id from list
            cursor = resolver.query(APN_URI, null, " apn = ? and current = 1", new String[]{newAPN.toLowerCase()}, null);
            String apnId = null;
            if (cursor != null && cursor.moveToFirst()) {
                apnId = cursor.getString(cursor.getColumnIndex("_id"));
            }
            cursor.close();
            Log.e("NetCheck updateCurrentAPN","apnId:"+apnId);
            //set new apn id as chosen one
            if (apnId != null) {
                ContentValues values = new ContentValues();
                values.put("apn_id", apnId);
                resolver.update(CURRENT_APN_URI, values, null, null);
            } else {
                //apn id not found, return 0.
                return 0;
            }
        } catch (SQLException e) {
        	Log.e("NetCheck updateCurrentAPN",e.getMessage());
        } finally {
            if (cursor != null) {
                cursor.close();
            }
        } 

        //update success
        return 1;
} 

	public boolean checkNetworkInfo(Context c) {
		boolean ret=false;
		ConnectivityManager conManager= (ConnectivityManager) c.getSystemService(Context.CONNECTIVITY_SERVICE);
		NetworkInfo info = conManager.getNetworkInfo(ConnectivityManager.TYPE_MOBILE);
		boolean internet=conManager.getNetworkInfo(ConnectivityManager.TYPE_MOBILE).isConnectedOrConnecting();
        String oldAPN = StringUtils.null2String(info.getExtraInfo());
        String oldSQLAPN=StringUtils.null2String(getCurrentAPNFromSetting(c.getContentResolver()));

        Log.e("NetCheck checkNetworkInfo","oldAPN:"+oldAPN+" oldSQLAPN:"+oldSQLAPN);
        if (internet==false||!"cmnet".equals(oldAPN.toLowerCase())||!"cmnet".equals(oldSQLAPN.toLowerCase())) {
            if("cmwap".equals(oldAPN.toLowerCase())&&"cmnet".equals(oldSQLAPN.toLowerCase())){
            	updateCurrentAPN(c.getContentResolver(), "cmwap");
            	try {
					Thread.sleep(200);
				} catch (InterruptedException e) {
					e.printStackTrace();
				}
            }
            updateCurrentAPN(c.getContentResolver(), "cmnet");
            try {
				Thread.sleep(200);
			} catch (InterruptedException e) {
				e.printStackTrace();
			}
            ret=true;
        }
        return ret; 

	}
}

4、HTTP请求前的判断

if (nc.checkNetworkInfo(LoginActivity.this)) {
				Thread.sleep(5000);// 设置cmnet网络
			}

本文原创,转载请注明来源 wizzer.cn。

20115 月28

Android:指定分辨率和清晰度的图片压缩方法源码

public void transImage(String fromFile, String toFile, int width, int height, int quality)
	{
		try
		{
			Bitmap bitmap = BitmapFactory.decodeFile(fromFile);
			int bitmapWidth = bitmap.getWidth();
			int bitmapHeight = bitmap.getHeight();
			// 缩放图片的尺寸
			float scaleWidth = (float) width / bitmapWidth;
			float scaleHeight = (float) height / bitmapHeight; 
			Matrix matrix = new Matrix();
			matrix.postScale(scaleWidth, scaleHeight);
			// 产生缩放后的Bitmap对象
			Bitmap resizeBitmap = Bitmap.createBitmap(bitmap, 0, 0, bitmapWidth, bitmapHeight, matrix, false);
			// save file
			File myCaptureFile = new File(toFile);
			FileOutputStream out = new FileOutputStream(myCaptureFile);
			if(resizeBitmap.compress(Bitmap.CompressFormat.JPEG, quality, out)){
				out.flush();
				out.close();
			}
			if(!bitmap.isRecycled()){
				bitmap.recycle();//记得释放资源,否则会内存溢出
			}
			if(!resizeBitmap.isRecycled()){
				resizeBitmap.recycle();
			}

		}
		catch (FileNotFoundException e)
		{
			e.printStackTrace();
		}
		catch (IOException ex)
		{
			ex.printStackTrace();
		}
	}
20115 月19

Android:解决ProgressDialog提示框不转动

ProgressDialog 解决“第一次执行图标转动,第二次执行不转动”代码:

@Override
	protected Dialog onCreateDialog(int id) {
		switch (id) {
		case PROGRESS_DIALOG:
			progressDialog = new ProgressDialog(LoginActivity.this);
			progressDialog.setMessage("正在登陆,请稍等...");
			progressDialog.setCancelable(true);
			// 设置ProgressDialog 是否可以按退回按键取消
			return progressDialog;
		default:
			return null;
		}
	}

	@Override
	protected void onPrepareDialog(int id, Dialog dialog) {
		switch (id) {
		case PROGRESS_DIALOG:
			dialog
					.setOnDismissListener(new DialogInterface.OnDismissListener() {
						@Override
						public void onDismiss(DialogInterface dialog) {
							removeDialog(PROGRESS_DIALOG);//这个起作用
							if (progressThread != null) {
								progressThread = null;
							}
						}
					});
		}
	}
20115 月19

Android:设置APN为cmnet源码

public class APNActivity extends Activity {

        public static final Uri APN_URI = Uri.parse("content://telephony/carriers");
        public static final Uri CURRENT_APN_URI = Uri.parse("content://telephony/carriers/preferapn");

        @Override
        public void onCreate(Bundle savedInstanceState) {
                super.onCreate(savedInstanceState);
                setContentView(R.layout.main);
                int _cmnetId = addAPN();
                SetAPN(_cmnetId);
        }
       public void checkAPN(){
      // 检查当前连接的APN
              Cursor cr = getContentResolver().query(CURRENT_APN_URI, null, null,
              null, null);
              while (cr != null && cr.moveToNext()) {
                  // APN id
                  String id = cr.getString(cr.getColumnIndex("_id"));
                  // APN name
                  String apn = StringUtils.null2String(cr
                  .getString(cr.getColumnIndex("apn")));
                  // Toast.makeText(getApplicationContext(),
                  // "当前 id:" + id + " apn:" + apn, Toast.LENGTH_LONG).show();

       }

        //新增一个cmnet接入点
        public int addAPN() {
                int id = -1;
                ContentResolver resolver = this.getContentResolver();
                ContentValues values = new ContentValues();
                values.put("name", "cmnet");
                values.put("apn", "cmnet");
                Cursor c = null;
                Uri newRow = resolver.insert(APN_URI, values);
                if (newRow != null) {
                        c = resolver.query(newRow, null, null, null, null);
                        int idIndex = c.getColumnIndex("_id");
                        c.moveToFirst();
                        id = c.getShort(idIndex);
                }
                if (c != null)
                        c.close();
                return id;
        }
        //设置接入点
        public void SetAPN(int id) {
                ContentResolver resolver = this.getContentResolver();
                ContentValues values = new ContentValues();
                values.put("apn_id", id);
                resolver.update(CURRENT_APN_URI, values, null, null);
        }
}
20115 月18

Android:实用代码(开启启动、建立GPRS连接、闹钟等)

1:查看是否有存储卡插入

String status=Environment.getExternalStorageState();
if(status.equals(Enviroment.MEDIA_MOUNTED))
{
说明有SD卡插入
}

2:让某个Activity透明

OnCreate中不设Layout
this.setTheme(R.style.Theme_Transparent);

以下是Theme_Transparent的定义(注意transparent_bg是一副透明的图片)

3:在屏幕元素中设置句柄

使用Activity.findViewById来取得屏幕上的元素的句柄. 使用该句柄您可以设置或获取任何该对象外露的值.
TextView msgTextView = (TextView)findViewById(R.id.msg);
msgTextView.setText(R.string.push_me);

4:发送短信

String body=”this is mms demo”;

Intent mmsintent = new Intent(Intent.ACTION_SENDTO, Uri.fromParts(”smsto”, number, null));
mmsintent.putExtra(Messaging.KEY_ACTION_SENDTO_MESSAGE_BODY, body);
mmsintent.putExtra(Messaging.KEY_ACTION_SENDTO_COMPOSE_MODE, true);
mmsintent.putExtra(Messaging.KEY_ACTION_SENDTO_EXIT_ON_SENT, true);
startActivity(mmsintent);

5:发送彩信

StringBuilder sb = new StringBuilder();

sb.append(”file://”);

sb.append(fd.getAbsoluteFile());

Intent intent = new Intent(Intent.ACTION_SENDTO, Uri.fromParts(”mmsto”, number, null));
// Below extra datas are all optional.
intent.putExtra(Messaging.KEY_ACTION_SENDTO_MESSAGE_SUBJECT, subject);
intent.putExtra(Messaging.KEY_ACTION_SENDTO_MESSAGE_BODY, body);
intent.putExtra(Messaging.KEY_ACTION_SENDTO_CONTENT_URI, sb.toString());
intent.putExtra(Messaging.KEY_ACTION_SENDTO_COMPOSE_MODE, composeMode);
intent.putExtra(Messaging.KEY_ACTION_SENDTO_EXIT_ON_SENT, exitOnSent);

startActivity(intent);

6:发送Mail

mime = “img/jpg”;
shareIntent.setDataAndType(Uri.fromFile(fd), mime);
shareIntent.putExtra(Intent.EXTRA_STREAM, Uri.fromFile(fd));
shareIntent.putExtra(Intent.EXTRA_SUBJECT, subject);

shareIntent.putExtra(Intent.EXTRA_TEXT, body);

7:注册一个BroadcastReceiver

registerReceiver(mMasterResetReciever, new IntentFilter(”OMS.action.MASTERRESET”));

private BroadcastReceiver mMasterResetReciever = new BroadcastReceiver() {

public void onReceive(Context context, Intent intent){
String action = intent.getAction();
if(”oms.action.MASTERRESET”.equals(action)){
RecoverDefaultConfig();
}
}

};

8:定义ContentObserver,监听某个数据表

private ContentObserver mDownloadsObserver = new DownloadsChangeObserver(Downloads.CONTENT_URI);

private class DownloadsChangeObserver extends ContentObserver {
public DownloadsChangeObserver(Uri uri) {
super(new Handler());

}

@Override
public void onChange(boolean selfChange) {}
}

9:获得 手机UA

public String getUserAgent()
{
String user_agent = ProductProperties.get(ProductProperties.USER_AGENT_KEY, null);
return user_agent;
}

10:清空手机上Cookie

CookieSyncManager.createInstance(getApplicationContext());
CookieManager.getInstance().removeAllCookie();

11:建立GPRS连接

//Dial the GPRS link.
private boolean openDataConnection() {
// Set up data connection.
DataConnection conn = DataConnection.getInstance();

if (connectMode == 0) {
ret = conn.openConnection(mContext, “cmwap”, “cmwap”, “cmwap”);
} else {
ret = conn.openConnection(mContext, “cmnet”, “”, “”);
}

}

12:PreferenceActivity 用法

public class Setting extends PreferenceActivity

public void onCreate(Bundle savedInstanceState) {
super.onCreate(savedInstanceState);
addPreferencesFromResource(R.xml.settings);
}

Setting.xml:

Android:key=”seting2″
android:title=”@string/seting2″
android:summary=”@string/seting2″/>

android:key=”seting1″
android:title=”@string/seting1″
android:summaryOff=”@string/seting1summaryOff”
android:summaryOn=”@stringseting1summaryOff”/>

13:通过HttpClient从指定server获取数据

DefaultHttpClient httpClient = new DefaultHttpClient();
HttpGet method = new HttpGet(“http://www.baidu.com/1.html”);
HttpResponse resp;
Reader reader = null;
try {
// AllClientPNames.TIMEOUT
HttpParams params = new BasicHttpParams();
params.setIntParameter(AllClientPNames.CONNECTION_TIMEOUT, 10000);
httpClient.setParams(params);
resp = httpClient.execute(method);
int status = resp.getStatusLine().getStatusCode();

if (status != HttpStatus.SC_OK) return false;

// HttpStatus.SC_OK;
return true;
} catch (ClientProtocolException e) {
// TODO Auto-generated catch block
e.printStackTrace();
} catch (IOException e) {
// TODO Auto-generated catch block
e.printStackTrace();
} finally {
if (reader != null) try {
reader.close();
} catch (IOException e) {
// TODO Auto-generated catch block
e.printStackTrace();
}
}

14:显示toast

Toast.makeText(this._getApplicationContext(), R.string._item, Toast.LENGTH_SHORT).show();

15:屏幕显示

程序中默的显示是带有标题栏和系统信息栏的,有的时候,这很影响程序界面的美观。手机默认的是竖屏,或与感应器状态相关,为了某种效果,我们的程序需要限制使用横屏或竖屏。以下的代码就解决了上述问题。

//设置为无标题栏
requestWindowFeature(Window.FEATURE_NO_TITLE);
//设置为全屏模式
getWindow().setFlags(WindowManager.LayoutParams.FLAG_FULLSCREEN, WindowManager.LayoutParams.FLAG_FULLSCREEN);
//设置为横屏
setRequestedOrientation(ActivityInfo.SCREEN_ORIENTATION_LANDSCAPE);

16:Intent传参

当Activity与Activity/Service(或其它情况)有时与要进行参数传递,最常用也是最简单的方式就是通过Intent来处理。
看如下代码:
Intent intent = new Intent(…);
Bundle bundle = new Bundle();
bundle.putString(“NAME”, “zixuan”);
intent.putExtras(bundle);
context.startActivity(intent); 或 context.startService(intent);

当然,有传送就有接收,接收也很简单,如:
Bundle bunde = intent.getExtras();
String name = bunde.getInt(“NAME”);
当然参数KEY要与传送时的参数一致。

17:获取手机号

在j2me中,根本没有办法获取用户的手机号码,就连获取手机串号(IMEI)都基本上无法实现,然后在android手机上一切都是如此的简单,看代码:
TelephonyManager tm = (TelephonyManager)context.getSystemService(Context.TELEPHONY_SERVICE);
String imei = tm.getDeviceId();
String tel = tm.getLine1Number();
看来,android的确加速了j2me的消亡。

18:振动器

总感觉手机上的振动器没有多大用处(当然静音模式下的振铃很有用),但还是顺带着说一下吧,只有两行代码:
1、获取振动服务的实例
Vibrator vibrator = (Vibrator) getSystemService(Context.VIBRATOR_SERVICE);
2、设置振动时长,单位当然也是ms
vibrator.vibrate(1000);
如果你觉得这样过去单调的话,可以设个节奏:
vibrator.vibrate(new long[]{10, 100, 20, 200}, -1);
两个参数,习惯告诉我第一个是节奏,第二个是重复次数,可事实并没有这么简单,我翻译不好,大家还是看原文吧:
public void vibrate (long[] pattern, int repeat)
pattern: an array of longs of times to turn the vibrator on or off.
repeat: the index into pattern at which to repeat, or -1 if you don’t want to repeat.
google喜欢弄些技巧,我却觉得这里有点弄巧成拙了。

19:闹钟管理

最近看了一下Android的闹钟管理类(AlarmManager),真不错误,强大又简单,代码如下:

1)、建立一个AlarmReceiver继承入BroadcastReceiver,并在AndroidManifest.xml声明
public static class AlarmReceiver extends BroadcastReceiver {
@Override
public void onReceive(Context context, Intent intent) {
Toast.makeText(context, “闹钟提示:时间到!”, Toast.LENGTH_LONG).show();
}
}

2)、建立Intent和PendingIntent,来调用目标组件。
Intent intent = new Intent(this, AlarmReceiver.class);
PendingIntent pendingIntent = PendingIntent.getBroadcast(this, 0, intent, 0);

3)、设置闹钟
获取闹钟管理的实例:
AlarmManager alarmManager = (AlarmManager) getSystemService(Context.ALARM_SERVICE);
设置单次闹钟:
alarmManager.set(AlarmManager.RTC_WAKEUP, System.currentTimeMillis() + (5*1000), pendingIntent);
设置周期闹钟:
alarmManager.setRepeating(AlarmManager.RTC_WAKEUP, System.currentTimeMillis() + (10*1000), (24*60*60*1000), pendingIntent);

20:开机自启动

1).定义一个BroadcastReceiver

public class BootReceiver extends BroadcastReceiver {
public void onReceive(Context ctx, Intent intent) {
Log.d(“BootReceiver”, “system boot completed”);
//start activity
String action=”android.intent.action.MAIN”;
String category=”android.intent.category.LAUNCHER”;
Intent myi=new Intent(ctx,CustomDialog.class);
myi.setAction(action);
myi.addCategory(category);
myi.addFlags(Intent.FLAG_ACTIVITY_NEW_TASK);
ctx.startActivity(myi);
//start service
Intent s=new Intent(ctx,MyService.class);
ctx.startService(s);
}
}

2).配置Receiver的许可,允许接收系统启动消息,在AndroidManifest.xml中:

3).配置Receiver,可以接收系统启动消息,在AndroidManifest.xml中


4).启动模拟器,可以看到系统启动后,弹出一个对话框。

本文来自CSDN博客,转载请标明出处:http://blog.csdn.net/lxh2808/archive/2010/10/30/5976351.aspx

20115 月4

Android 手机端与服务端POST数据交互类


package com.wizzer.tools;

import java.io.*;
import java.net.URLEncoder;

import java.util.*;

import org.apache.http.HttpResponse;

import org.apache.http.client.HttpClient;
import org.apache.http.client.entity.UrlEncodedFormEntity;
import org.apache.http.client.methods.HttpPost;
import org.apache.http.impl.client.DefaultHttpClient;
import org.apache.http.message.BasicNameValuePair;
import org.apache.http.protocol.HTTP;
import org.apache.http.NameValuePair;
import org.json.JSONArray;
import org.json.JSONException;

import android.app.Activity;
import android.app.Dialog;
import android.app.ProgressDialog;

public class BaseProtocol 
{
	private StringBuilder sb = new StringBuilder();
	private HttpClient httpClient;
	private HttpPost httpRequest;
	private HttpResponse response;
	private List<NameValuePair> nameValuePair = new ArrayList<NameValuePair>();
	private static final int DIALOG1_KEY = 0;
	private static final int DIALOG2_KEY = 1;

	public BaseProtocol()
	{
		httpClient = new DefaultHttpClient();
	}

	/**
	 * *向服务器端发送请求 * *@paramurl *@throwsException
	 * 
	 * @throws UnsupportedEncodingException
	 */
	public void pack(String url) throws Exception
	{
		httpClient = new DefaultHttpClient();
		httpRequest = new HttpPost(url);
		httpRequest.setEntity(new UrlEncodedFormEntity(nameValuePair));
		response = httpClient.execute(httpRequest);
	}

	/** *得到返回数据 * *@paramurl *@return *@throwsException */

	public String parse() throws Exception
	{
		// TODO状态处理500200
		if (response.getStatusLine().getStatusCode() == 200)
		{
			BufferedReader bufferedReader2 = new BufferedReader(new InputStreamReader(response.getEntity().getContent()));
			for (String s = bufferedReader2.readLine(); s != null; s = bufferedReader2.readLine())
			{
				sb.append(s);
			}
		}
		return sb.toString();
	}

	/***
	 * 向服务器发送信息 * *@paramkey *@paramvalue
	 * 
	 * @throws UnsupportedEncodingException
	 */
	public void addNameValuePair(String key, String value) throws UnsupportedEncodingException
	{
		nameValuePair.add(new BasicNameValuePair(key, URLEncoder.encode(value, HTTP.UTF_8)));
	}

	/** *返回JSONArray对象数据模型 * *@return *@throwsJSONException */

	public JSONArray getJSON() throws JSONException
	{
		return new JSONArray(sb.toString());
	}

}
20115 月4

合肥 Android/Java开发交流群:26310065

手机开发:WM、Android、iOS
WEB开发:Java、.NET、ASP、PHP、JSP
应用开发:C#、JAVA……

欢迎IT从业人士加入,交流开发经验、技术,项目外包等信息。
QQ群:26310065

20114 月1

Android开发:屏幕常亮 PowerManager和PowerManager.WakeLock

前言

  学习android一段时间了,为了进一步了解android的应用是如何设计开发的,决定详细研究几个开源的android应用。从一些开源应用中吸收点东西,一边进行量的积累,一边探索android的学习研究方向。这里我首先选择了jwood的 Standup Timer 项目。本文将把研究的内容笔记整理,建立一个索引列表。

PowerManager.WakeLock

  PowerManager.WakerLock是我分析Standup Timer源代码时发现的一个小知识点,Standup Timer 用WakeLock保证程序运行时保持手机屏幕的恒亮(程序虽小但也做得相当的细心,考虑的很周到)。PowerManager 和PowerManager.WakerLock7用于对Android设备的电源进行管理。
  PowerManager:This class gives you control of the power state of the device.
  PowerManager.WakeLock: lets you say that you need to have the device on.
  Android中通过各种Lock锁对电源进行控制,需要注意的是加锁和解锁必须成对出现。先上一段Standup Timer里的代码然后进行说明。
private void acquireWakeLock() {
         if (wakeLock == null) {
                Logger.d("Acquiring wake lock");
                PowerManager pm = (PowerManager) getSystemService(Context.POWER_SERVICE);
                wakeLock = pm.newWakeLock(PowerManager.SCREEN_DIM_WAKE_LOCK, this.getClass().getCanonicalName());
                wakeLock.acquire();
            }

    }

private void releaseWakeLock() {
        if (wakeLock != null && wakeLock.isHeld()) {
            wakeLock.release();
            wakeLock = null;
        }

    }


acquireWakeLock()方法中获取了 SCREEN_DIM_WAKE_LOCK锁,该锁使 CPU 保持运转,屏幕保持亮度(可以变灰)。这个函数在Activity的 onResume中被调用。releaseWakeLock()方法则是释放该锁。它在Activity的 onPause中被调用。利用Activiy的生命周期,巧妙的让 acquire()和release()成对出现。

    @Override
    protected void onResume()
    {
        super.onResume();
                //获取锁,保持屏幕亮度
        acquireWakeLock();
        startTimer();
    }
protected void onPause()
    {
        super.onPause();
         synchronized(this) {
                cancelTimer();
                releaseWakeLock();

                if (finished) {
                    clearState();
                } else {
                    saveState();
                }
            }
    }


PowerManager和WakeLock的操作步骤
  1.   PowerManager pm = (PowerManager) getSystemService(Context.POWER_SERVICE);通过 Context.getSystemService().方法获取PowerManager实例。
  2.   然后通过PowerManager的newWakeLock((int flags, String tag)来生成WakeLock实例。int Flags指示要获取哪种WakeLock,不同的Lock对cpu 、屏幕、键盘灯有不同影响。
  3.   获取WakeLock实例后通过acquire()获取相应的锁,然后进行其他业务逻辑的操作,最后使用release()释放(释放是必须的)。

关于int flags

  各种锁的类型对CPU 、屏幕、键盘的影响:

PARTIAL_WAKE_LOCK:保持CPU 运转,屏幕和键盘灯有可能是关闭的。

SCREEN_DIM_WAKE_LOCK:保持CPU 运转,允许保持屏幕显示但有可能是灰的,允许关闭键盘灯

SCREEN_BRIGHT_WAKE_LOCK:保持CPU 运转,允许保持屏幕高亮显示,允许关闭键盘灯

FULL_WAKE_LOCK:保持CPU 运转,保持屏幕高亮显示,键盘灯也保持亮度

ACQUIRE_CAUSES_WAKEUP:Normal wake locks don’t actually turn on the illumination. Instead, they cause the illumination to remain on once it turns on (e.g. from user activity). This flag will force the screen and/or keyboard to turn on immediately, when the WakeLock is acquired. A typical use would be for notifications which are important for the user to see immediately.

ON_AFTER_RELEASE:f this flag is set, the user activity timer will be reset when the WakeLock is released, causing the illumination to remain on a bit longer. This can be used to reduce flicker if you are cycling between wake lock conditions.

权限获取

要进行电源的操作需要在AndroidManifest.xml中声明该应用有设置电源管理的权限。
<uses-permission android:name="android.permission.WAKE_LOCK" /> 你可能还需要 <uses-permission android:name="android.permission.DEVICE_POWER" />

另外WakeLock的设置是 Activiy 级别的,不是针对整个Application应用的。


摘自:http://fanwei51880.blog.163.com/blog/static/324067402010108105416798/

20111 月26

Android 开发:TextView 文字阴影效果

res/values/styles.xml

<?xml version="1.0" encoding="utf-8"?>
<resources>
<style name="AudioFileInfoOverlayText">
    <item name="android:paddingLeft">4px</item>
    <item name="android:paddingBottom">4px</item>
    <item name="android:textColor">#f1f1f1</item>
    <item name="android:textSize">60sp</item>
    <item name="android:shadowColor">#4d4d4d</item>
    <item name="android:shadowDx">0</item>
    <item name="android:shadowDy">-3</item>
    <item name="android:shadowRadius">3</item>
</style>
</resources>

res/layout/main.xml

<TextView style="@style/AudioFileInfoOverlayText" 
        android:id="@+id/title"
		android:layout_gravity="bottom"
		android:gravity="center_vertical|center_horizontal"
		android:layout_width="640px" android:layout_height="151px"
		android:background="@drawable/compass_bottom"
		></TextView>