经验分享:Chrome插件开发源码说明
Chrome插件开发极其简单,只要会JS+HTML+CSS即可,当然我捣鼓的是简单的应用作为学习和验证之用,没有更多的深入。
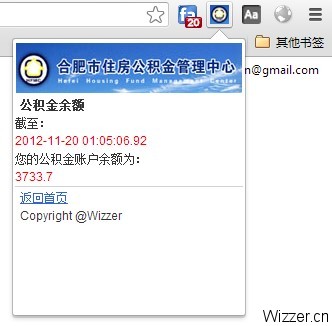
本示例采用 jQuery 实现用户登录查询公积金余额功能,接口提供的功能较多但作为学习么,只开发了一个查询余额的功能。
运行效果:

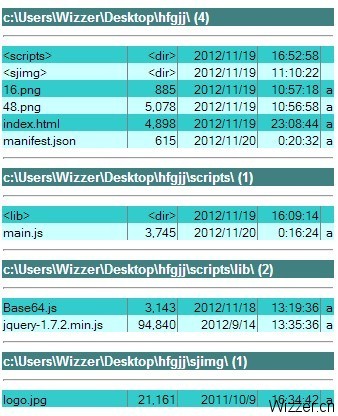
1、首先创建文件夹,文档结构如下:
2、编辑manifest.json文件,填写应用信息、访问权限等:
{
  "name": "合肥公积金查询",
  "version": "2012.11.20.0",
  "manifest_version": 2,
  "description": "这是一款合肥市住房公积金查询工具,用于学习测试仅提供余额查询。@Wizzer",
  "icons":{"16":"16.png","48":"48.png"},
  "content_scripts":[{
      "js": [ "scripts/lib/jquery-1.7.2.min.js","scripts/main.js"],
      "matches": [ "http://*/*", "https://*/*" ]
   }],
  "browser_action": {
    "default_icon": "16.png",
    "default_popup": "index.html"
  },
  "homepage_url":"",
  "permissions": [ "cookies", "tabs", "http://*/*", "https://*/*" ]

}
注意事项:
A、目前最新版的chrome要求设置 “manifest_version”: 2 ;
B、permissions 配置了cookies权限,因为在应用中加入了记住密码功能;
C、API要求JS不可以内联,就是不能直接在页面元素上写JS,例如点击按钮alert提示都不会执行的;
3、本着JS和HTML分离的原则,编写 main.js 文件:
var url = "/chrome";
var key = "接口APP_KEY隐藏";
var zgyhzh="";
var dwyhzh="";
var uptime="";
var hm="";
var mm="";
if (!chrome.cookies) {
chrome.cookies = chrome.experimental.cookies;
}
function delCookie(name) {
chrome.cookies.remove({"name": name,"url":url});
}
function setCookie(name,value) {
chrome.cookies.set({"name": name,"value":value,"url":url ,"expirationDate":1392000000});
}
function initCookie() {
var str="";
chrome.cookies.get({"name": "hm","url":url },function(cookie){
str=cookie.value;
if(""!=str){
$('#savehm').attr("checked",true);
$('#hm').val(Base64.decode(str));
}
});
chrome.cookies.get({"name": "mm","url":url },function(cookie){
str=cookie.value;
if(""!=str){
$('#savemm').attr("checked",true);
$('#mm').val(Base64.decode(str));
}
});
}
function login(){
hm=Base64.encode($('#hm').val());
mm=Base64.encode($('#mm').val());
$.ajax({
url : "http://220.178.98.86/hfgjj/service/login.jsp",
data : {"hm":hm,"mm":mm,"app_key":key} ,
success : function (res) {
loginData(res);
return false;
},
fail : function(res) {
loginData(res);
}
});
}
function loginData(res){
if(res.indexOf("error")>=0){
var obj = jQuery.parseJSON(res);
if(""!=obj.tip){
$("#tip").html("
"+obj.tip+"");
}
}else if(res.indexOf("more")>=0){
var obj = jQuery.parseJSON(res);
if("false"==obj.more){
zgyhzh=obj.zgyhzh;
dwyhzh=obj.dwyhzh;
uptime=obj.uptime;
oneData();
}else if("true"==obj.more){
uptime=obj.uptime;
var zgyhzhlist=obj.zgyhzhlist;
$.each(zgyhzhlist,function(entryIndex,entry){
if("true"==entry.zt){
zgyhzh=entry.zgyhzh;
dwyhzh=entry.dwyhzh;
oneData();
$("#note")[0].style.display='block';
return;
}
});
}
}else{
$("#tip").html("
"+res+"");
}
}
function oneData(){
var z=Base64.encode(zgyhzh);
var d=Base64.encode(dwyhzh);
$.ajax({
url : "http://220.178.98.86/hfgjj/service/grindex.jsp",
data : {"hm":hm,"mm":mm,"app_key":key,"zgyhzh":z,"dwyhzh":d} ,
success : function (res) {
showData(res);
return false;
},
fail : function(res) {
}
});
}
function showData(res){
if(res.indexOf("error")>=0){
var obj = jQuery.parseJSON(res);
if(""!=obj.tip){
$("#tip").html("
"+obj.tip+"");
}
}else{
$("#T1")[0].style.display='none';
$("#T2")[0].style.display='block';
var obj = jQuery.parseJSON(res);
var scje=obj.scje;
$("#uptime").html(""+uptime+"");
$("#yue").html(""+scje+"");
}
}
function init(){
initCookie();
$('#bt').click(function() {
if($('#savemm').attr('checked')){
setCookie("mm",Base64.encode($('#mm').val()));
setCookie("hm",Base64.encode($('#hm').val()));
}else if($('#savehm').attr('checked')){
setCookie("mm","");
setCookie("hm",Base64.encode($('#hm').val()));
}else{
setCookie("mm","");
setCookie("hm","");
}
$("#tip").html("
Loading...");
login();
});
$('#savemm').click(function() {
if($('#savemm').attr('checked')){
$('#savehm').attr("checked",true);
}else{
$('#savehm').attr("checked",false);
}
});
}
document.addEventListener('DOMContentLoaded', function () {
init();
});
PS:搞开发的JS都能看懂,就不注释了。。。
4、index.html 页面的代码:
合肥市住房公积金查询 BODY { PADDING-BOTTOM: 0px; LINE-HEIGHT: 1.5em; MARGIN: 0px; PADDING-LEFT: 0px; PADDING-RIGHT: 0px; WORD-WRAP: break-word; FONT-SIZE: 12px; WORD-BREAK: break-all; PADDING-TOP: 0px } DIV { PADDING-BOTTOM: 0px; LINE-HEIGHT: 1.5em; MARGIN: 0px; PADDING-LEFT: 0px; PADDING-RIGHT: 0px; WORD-WRAP: break-word; FONT-SIZE: 12px; WORD-BREAK: break-all; PADDING-TOP: 0px } P { PADDING-BOTTOM: 0px; LINE-HEIGHT: 1.5em; MARGIN: 0px; PADDING-LEFT: 0px; PADDING-RIGHT: 0px; WORD-WRAP: break-word; FONT-SIZE: 12px; WORD-BREAK: break-all; PADDING-TOP: 0px } EM { PADDING-BOTTOM: 0px; LINE-HEIGHT: 1.5em; MARGIN: 0px; PADDING-LEFT: 0px; PADDING-RIGHT: 0px; WORD-WRAP: break-word; FONT-SIZE: 12px; WORD-BREAK: break-all; PADDING-TOP: 0px } SPAN { PADDING-BOTTOM: 0px; LINE-HEIGHT: 1.5em; MARGIN: 0px; PADDING-LEFT: 0px; PADDING-RIGHT: 0px; WORD-WRAP: break-word; FONT-SIZE: 12px; WORD-BREAK: break-all; PADDING-TOP: 0px } A { PADDING-BOTTOM: 0px; LINE-HEIGHT: 1.5em; MARGIN: 0px; PADDING-LEFT: 0px; PADDING-RIGHT: 0px; WORD-WRAP: break-word; FONT-SIZE: 12px; WORD-BREAK: break-all; PADDING-TOP: 0px } TD { PADDING-BOTTOM: 0px; LINE-HEIGHT: 1.5em; MARGIN: 0px; PADDING-LEFT: 0px; PADDING-RIGHT: 0px; WORD-WRAP: break-word; FONT-SIZE: 12px; WORD-BREAK: break-all; PADDING-TOP: 0px } FORM { PADDING-BOTTOM: 0px; LINE-HEIGHT: 1.5em; MARGIN: 0px; PADDING-LEFT: 0px; PADDING-RIGHT: 0px; WORD-WRAP: break-word; FONT-SIZE: 12px; WORD-BREAK: break-all; PADDING-TOP: 0px } BUTTON { PADDING-BOTTOM: 0px; LINE-HEIGHT: 1.5em; MARGIN: 0px; PADDING-LEFT: 0px; PADDING-RIGHT: 0px; WORD-WRAP: break-word; FONT-SIZE: 12px; WORD-BREAK: break-all; PADDING-TOP: 0px } body {COLOR: #333 ;min-width: 220px; margin: 0; font: 12px "Helvetica Neue", Helvetica, Arial, sans-serif; width: auto} EM { FONT-WEIGHT: bold } STRONG { FONT-WEIGHT: bold } DEL { TEXT-DECORATION: line-through } INPUT { MARGIN: 2px 0px; FONT-SIZE: 12px } SELECT { MARGIN: 2px 0px; FONT-SIZE: 12px } IMG { BORDER-BOTTOM: medium none; BORDER-LEFT: medium none; BORDER-TOP: medium none; BORDER-RIGHT: medium none } HR { BORDER-BOTTOM: 0px; BORDER-LEFT: 0px; HEIGHT: 0px; CLEAR: both; BORDER-TOP: #ddd 1px solid; BORDER-RIGHT: 0px } A:link { COLOR: #36c; TEXT-DECORATION: underline } A:visited { COLOR: #36c; TEXT-DECORATION: underline } A.im { COLOR: #f60 } .im { COLOR: #f60 } .imp { COLOR: #f00 } .gp { COLOR: #06c } .mp { COLOR: #f90 } .module { PADDING-BOTTOM: 0px; PADDING-LEFT: 5px; PADDING-RIGHT: 5px; PADDING-TOP: 0px } .wrapper { } .none { DISPLAY: none } .header { BORDER-BOTTOM: #d2d2d2 1px solid; PADDING-BOTTOM: 2px; PADDING-LEFT: 5px; PADDING-RIGHT: 5px; BACKGROUND: #f5f5f5; PADDING-TOP: 2px } .footer { PADDING-BOTTOM: 2px; PADDING-LEFT: 5px; PADDING-RIGHT: 5px; BORDER-TOP: #d2d2d2 1px solid; PADDING-TOP: 2px } .logo { PADDING-BOTTOM: 0px; PADDING-LEFT: 1px; PADDING-RIGHT: 1px; PADDING-TOP: 2px } .logo A { FONT-SIZE: 14px; TEXT-DECORATION: none } .nav { PADDING-BOTTOM: 5px; PADDING-LEFT: 5px; PADDING-RIGHT: 5px; PADDING-TOP: 5px } .cl { } .module { MARGIN-TOP: 3px } .gtt { TEXT-ALIGN: center } .capt { VERTICAL-ALIGN: middle } .err { BACKGROUND: #fc9 } .ptit { COLOR: #000; FONT-SIZE: 14px }个人公积金查询身份证号码
记住号码
密码
记住密码
5、调试部署:
菜单–工具–扩展程序–载入正在开发的扩展程序,右上角会出现16*16的图标,o(∩_∩)o 哈哈

6、将应用发布到google网上应用商城:
首次发布项目之前,您必须支付 US$5.00的一次性开发者注册费。我们收取此费用的目的是对开发者帐户进行验证,并为用户提供更好的保护,以防他们受到欺骗性活动的侵害。 支付注册费后,您就可以发布任意数量的项目,且无需再支付注册费了。
首先你需要有一张VISA信用卡,登陆google电子钱包注册信用卡。
https://www.google.com/checkout/ –注意要加https哦,你懂得
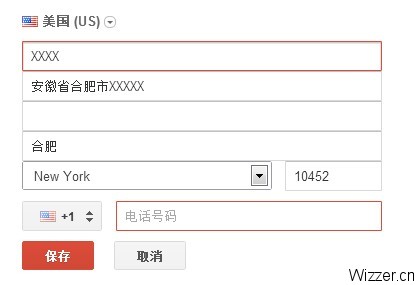
这里要注意的是,自动弹出的第一张信用卡注册界面不是如上的,很可能支付不成功,这个时候进入“支付方式”,选择修改信用卡,出现上面的界面选择New York 输入正确的邮编才能支付成功。
进入开发者中心(扩展程序最下面点击“获取更多扩展程序”,进入网上应用商城)
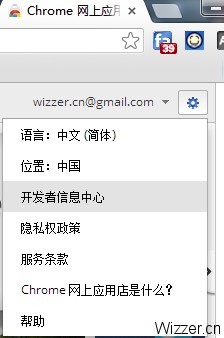
在开发者中心修改用户偏好设置,勾选“为我在 Chrome 网上应用店中的所有应用启用用户反馈功能。”,否则点击“立即支付注册费”会没反应(实在没辙换成IE试试吧)。
支付成功后耐心等待吧,我正在等待订单审核ing……
7、发布应用:
开发者中心点击添加新项目,把项目文件夹打包为zip压缩包上传即可。其他略,都能看懂。。
8、关于firewall:
以上许多操作,你会发现一会这个网页打不开,那个网页等白天没反应,这个时候你就需要用chrome插件“SwitchySharp”了,具体怎么用百度一下吧,步骤也很多很麻烦,关键是耐心按教程来。
chrome里可以用 SwitchySharp,那么IE里要用怎么办,在IE里手动设置下代理即可,端口号到 SwitchySharp 选项里查看。
可移步:http://www.delver.net/?p=267 看教程~~
9、其他
等订单审核完毕应用发布后,大家就可以在chrome 商城里搜索“合肥公积金查询”,那就是我写的这个应用了,如果你是win7系统的话,可以在:
C:\Users\Wizzer\AppData\Local\Google\Chrome\User Data\Default\Extensions
文件夹下看到源代码。over~~
几点思考,chrome插件是js+html+CSS的网页应用,不能直接执行JSP、ASP、PHP什么的,实现功能都需要调用chrome的接口、你自己应用提供的接口,那么可以不可以使用iframe嵌入自己的应用呢(- -)。
另外就是session传递的问题,从一个页面到另外一页面,信息怎么传递,用cookies感觉不太合适,也不能把所有的逻辑写在一个页面啊,这个需要深入的去研究。
再之就是js不能内联,那么实现一些功能就比较麻烦了,比如动态创建可点击的按钮,现在还没想到什么好办法,相信深入研究是可以解决的,JS要相当的熟才行啊,偶么就一般般。- –